RefreshOnActivate – Life Saver


Hey Friends,

Sometimes we go on hunting for a big giants and ignores the smaller one which can actually do the Job and this line is applicable for both the cases either its a Personal Life OR a Professional one. 🙂

I was just went  with one of such case where a property did what actually a bunch of codes where unable to perform.

Was working on one of the assignment where in Customer was willing to open a open web page from NAV Page and then update the content of that NAV Page from the Web One without pushing refresh every time to get the latest changes.

Though I was able to achieve this with multiple different solution but either of those solution’s where not perfect as each one of the left with some glitches.

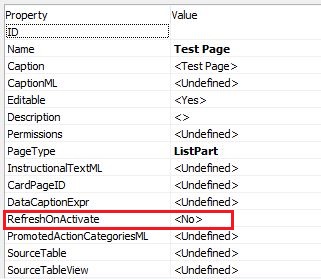
Then after a couple of hit and trial I just used the Page Property which says RefresOnActivate and just enabling it did the Job with absolute perfection.

CHANGE IT TO YES!!

Sometimes we should actually explore these small properties and the other one’s available, they come up as a miracle.

CHEERS!!

Dynamics NAV – POWER BI


Hey Friends,

I don’t know up to how much degree you people are in connected to POWER BI but I believe that’s one area you should stay continuously in touch with as this will help you out extremely to build an innovative reports with all Pie Charts, Stacked Bar chart and many different visualisations you wish to see. Just couple of tweaks needed and you will have the output.

So I will let share with you one simple Report which you can make it out in just chunk of minutes.

Download POWER BI Desktop Application, It will have some better performance to work on.

Now Open your POWER BI Desktop Application and here what you need to do –

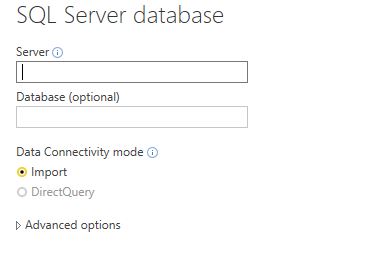
Navigate to Home Menu and and Click Get Data it will show you all the Drop Downs by which you can retrieve the Datasets to make your Report.  I will choose SQL Server so that directly I can have all my tables I need.


You can wish whatever you wish to choose other then SQL Server to fetch your Datasets. Once you Select SQL Server then it will prompt you for the credential to get yourself logged in


Enter your SQL Server Information and credential followed by the Database name if you know. Once it will get validated it will provide you the list of tall the tables of the Database you want to use use, Choose the Tables which you want to use and then push Load Data, it will load the tables you selected and will provide you in the work area.


The one I have Highlighted in Blue are the Tables I selected. Now this is the white space area is the place where you need to work on. So I made one simple report Pie Chart Report to Display Items Inventory By Item Category.


So this is the Very simple one which I made. If you take your Mouse to the Chart it will display you the available quantity for that category.

From the Right Panel you can n number of Visualisations whatever you wish to choose.  Bottom Most areas represents all the filters and the are area from where you can play all the look and feel changes you wish to do, You can different colours, Font Size, title and etc. You can also introduce Drill Down to take the information of the Pie chart to some further child information and all. For this you need to go back to the Tables and choose the columns , right click and then make a new hierarchy and those fields whoever you wish to introduce. So there’s lot many things which can play around.

If you see I have highlighted Manage Relationships, this is the area where you can have a join for 2 3 different tables however you wish.

In the extreme opposite ares of Visualisations you will find 3 sections which says

  1. Report – White Area where you working on.
  2. Data – It shows the data from the selected Tables.
  3. Relationships – Area which display how you have connected your tables with the Join Value.


In the Get Data Section , other then SQL Server you have Odata feed which also plays a very significant role to load your data directly from the Query, Just copy any Odata  Web-service and paste it there and you can load the data the same you you did from SQL Server and can make your Reports. Same way from Excel if you wish and other available areas.

Last but not the least if you will see the above screenshot, there’s one button which Says Publish, Once you are done with the Reporting you can Publish your Report directly on the Web. With this ease you can go to Web login your POWER BI and then can have your same Report which you check anywhere. Other then this you can make your Dashboard there and share this Dashboard or the Report to anyone you wish to share if you all are in same group. System will show all the email addresses from there Group and can be shared in just a click.

Explore and Enjoy!!

CHEERS

Upload File – Sharepoint


Hey Friends,

Many of us might have worked on different storage areas of a specific file and would have worked on several API’s to process a file to a certain location. I got one of the request from my customer where they urge to upload directly onto share-point. So I completed that stuff where they can simply upload the file and the dedicated SharePoint server will receive the file right away. Normally it will take a bit of time in Authenticating the server credentials and all for the first time then from the next time the execution time will somehow reduced. Still I will recommend not to upload directly if it could have an alternate because if it’s a big file then it could make you wait longer.

So here is the set of code which you need  to write

//RWN
ClientContext := ClientContext.ClientContext(‘URL’);
ClientContext.Credentials := NetworkCredential.NetworkCredential(‘Username’,
‘Password’,’Domain’);
FileCreationInformation := FileCreationInformation.FileCreationInformation;
FilePathL := FileManagementL.UploadFile(Text010,”);
FileCreationInformation.Content := FileContent.ReadAllBytes(FilePathL);
FileCreationInformation.Url := FileManagementL.GetFileName(FilePathL);
FileDirectoryL := FileManagementL.GetDirectoryName(FilePathL);
FileExtensionL := FileManagementL.GetExtension(FilePathL);
FileCreationInformation.Overwrite := TRUE;
Web := ClientContext.Web;
MyList := Web.Lists.GetByTitle(‘Library’);
//Folder
FolderName := MyList.RootFolder.Folders.GetByUrl(‘Folder Name’);
FolderName.Files.Add(FileCreationInformation);
//Library
MyList.RootFolder.Files.Add(FileCreationInformation);
ClientContext.ExecuteQuery;
//RWN

ClientContext DotNet

Microsoft.SharePoint.Client.ClientContext.’Microsoft.SharePoint.Client, Version=15.0.0.0, Culture=neutral, PublicKeyToken=71e9bce111e9429c’

FileCreationInformation DotNet

Microsoft.SharePoint.Client.FileCreationInformation.’Microsoft.SharePoint.Client, Version=15.0.0.0, Culture=neutral, PublicKeyToken=71e9bce111e9429c’

FileContent DotNet

System.IO.File.’mscorlib, Version=4.0.0.0, Culture=neutral, PublicKeyToken=b77a5c561934e089′

MyList DotNet

Microsoft.SharePoint.Client.List.’Microsoft.SharePoint.Client, Version=15.0.0.0, Culture=neutral, PublicKeyToken=71e9bce111e9429c’

Web DotNet

Microsoft.SharePoint.Client.Web.’Microsoft.SharePoint.Client, Version=15.0.0.0, Culture=neutral, PublicKeyToken=71e9bce111e9429c’

NetworkCredential DotNet

System.Net.NetworkCredential.’System, Version=4.0.0.0, Culture=neutral, PublicKeyToken=b77a5c561934e089′

FolderName DotNet

Microsoft.SharePoint.Client.Folder.’Microsoft.SharePoint.Client, Version=15.0.0.0, Culture=neutral, PublicKeyToken=71e9bce111e9429c’

SharepointFile DotNet

Microsoft.SharePoint.Client.File.’Microsoft.SharePoint.Client, Version=15.0.0.0, Culture=neutral, PublicKeyToken=71e9bce111e9429c’

FileLink DotNet

System.String.’mscorlib, Version=4.0.0.0, Culture=neutral, PublicKeyToken=b77a5c561934e089′

CHEERS
 

ACS Configuration Error – ACS Aunthetication


Hey Folks,

I just ended up with one of the error where one of my Customer was having ACS authentication to be functional for both NAV RTC and Web Clients. Event viewer of the error addresses something like this –

The service MicrosoftDynamicsNavServer$TestNav failed to start. This could be caused by a configuration error. Detailed error information: System.ServiceModel.AddressAccessDeniedException: HTTP could not register URL http://+:7047/TestNav/. Your process does not have access rights to this namespace (see http://go.microsoft.com/fwlink/?LinkId=70353 for details). —> System.Net.HttpListenerException: Access is denied

After an analysis I come into a conclusion where the port was not binded for the ACS to be functional. So here is the quick fix for this.

Open Command Prompt and execute this command –

netsh http add urlacl url=http://+:7047/TestNav/ user=”NT AUTHORITY\NETWORK SERVICE”

CHEERS

Cross-Dock


Hey Folks,

Once you go deep dive into Advance Warehousing then there’s many thing that comes into picture and Cross Dock is one of those method which could be very widely used once you experience this functionality and in today’s post am gonna explain this to you. Cross Dock is one of the most effective way in which you get rid of the entire Warehousing Put-Away process if the item that’s just been received can be utilised directly in the Sales order or somewhere in Production.

Am assuming you have all basic ideas of Zones and Bins and how its works in the system. So the very first thing you need to do is you have to do a basic setup for the Cross Dock bin, so navigate to your Location Card and define the bin in the Cross Dock Bin Code. Make sure the bin which you are defining is Cross Dock enabled bin.

Now after doing the setup in Location card what you need to do is you need to go back to the Item card and make sure in the Item Card too the Cross Dock is enabled.

All setup has been completed and now you have to go back to the Sales Order(Am Using Sales Order as an example) Make a new Sales Order for any an item with say 50 Quantity.

Now go back to the Purchase Order and make a Purchase of 50 quantity for the same Item for which you make the Sales Order. Now make the Whse. Receipt for the Purchase. Now enter the Quantity to Receive on Warehouse receipt and then click on Qty. to Cross-Dock on.

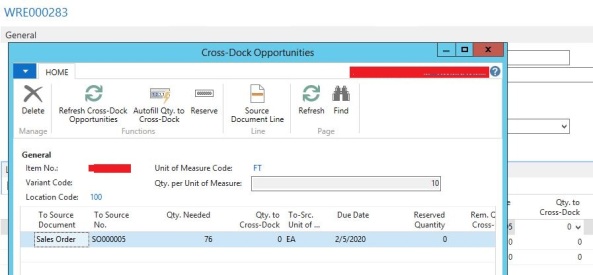
Here System will open a new screen for you i.e Cross Dock Opportunities. Now you have to Click on Refresh Cross-Dock Opportunities this will all bring all the respective areas from where this Item can be Cross-Docked, as I just made the Sales Order hence Sales Order for this item got appeared in front of me.

Now you have to click Auto-fill-Qty to Cross-Dock  and then do it OK. System will update the Qty to Cross-Cock section. Now Post the Receiving and this part is done.

Now if you will check you Put Away Document you will notice system is picking from the main Bin and placing it into the Cross Docked bin which you defined above. If the Bin is coming blank then simply move to right and there you will see one column which says Cross Dock Information which will make you understand like you just executed for the Cross Dock operation. If the Quantity is more in Purchase order then the quantity to be  Cross Docked then system will place the remaining quantity to the main Bins. Register the Document and complete the Put-Away.

Now go back to the same Sales Order and execute the Warehouse Shipment Process and Create the Pick for this Item. Here you will notice that system is now picking the Item from the same Cross-Dock Bin where it placed while Put Away. So that means now it Picking from the Cross Dock Bin and placing it into the Shipping Bin.

Complete the Pick Document and Post the Shipment.

CHEERS


Consume NAV Service – Get Item Picture


Hey Friends,

In my previous page I explained how to send Item picture over Web Service in a string, In this article I am gonna show how you can consume that service from C# side and show it to your Web application.

Below is the piece of code which you need to write, a bit of C# programming knowledge is needed and you are good to go.

In the E drive you will get the Image that is retrieved from NAV Side.


CHEERS!!

Item Picture- Webservice


Hey Friends,

I was just working on an assignment where I got the need of the customer like they want the Item Picture via web service. Another validation they put in was they don’t want the item picture to be saved on any particular directory instead they want on fly.

So now in standard NAV 2018 Item picture data-set has been changed from Blob to Mediaset so it was then added challenge. We need to convert the picture into streams and bytes and then we can send this over service but how to convert it into bytes. Converting Blob we all are well experienced but what about Mediaset.

There’s a new virtual table which Microsoft has introduced to maintain this identity in Blob which is Tenant Media. The reason why Microsoft did so is now we have the capability to add multiple pictures for an item.

So here is the piece of code how we are suppose to do this.

//RWN
Item.GET(ItemNo);
IF Item.Picture.COUNT = 0 THEN
EXIT(”);

TenantMedia.GET(Item.Picture.ITEM(1));
TenantMedia.CALCFIELDS(Content);
IF TenantMedia.Content.HASVALUE THEN BEGIN
CLEAR(PictureText);
CLEAR(PictureInStream);
TenantMedia.Content.CREATEINSTREAM(PictureInStream);
TempBlob.DELETEALL;
TempBlob.INIT;
TempBlob.Blob.CREATEOUTSTREAM(PicOutStream);
COPYSTREAM(PicOutStream,PictureInStream);
TempBlob.INSERT;
TempBlob.CALCFIELDS(Blob);
PictureText.ADDTEXT(TempBlob.ToBase64String);
END;
//RWN

Return this Picturetext in Web-service and they have to convert it from Base 64 string, they will have the real image.

Item Record Item
TenantMedia Record Tenant Media
PictureText BigText
PictureInStream InStream
TempBlob Record TempBlob

CHEERS

Permission Set – Security Filter


Hey Friends,

May be you all are aware about this feature in Permission Set which say Security Filter!! I just used and wanted to share this to you as this will add an extra security layer to your permission set. This basically works on field level, say you want to introduce one permission set and that permission should explicitly make the user to see only those records in Sales Order for which Salesperson code = SR,

Here’s how you can achieve this, Just navigate to Architectural Window./Departments/Administration/IT Administration/General/Permission Sets  and then hit permissions in the Action bar. Here you will find all set objects that has been introduced, just simply navigate to Sales Header and in the right side you will see security filters


Assist edit on this and then it will take you to new window which will give you the list of the Fields of that table and then you can apply your specific filter on any of the defined field.


Hit OK and you are done. Just apply this Role to any of the user and then cross verify!!

CHEERS

Soap Service – Special Characters


Hey Folks,

We all know SOAP Services has it’s own Protocol while commuting over different Platforms. Sometimes Client is willing to send special characters for there own reasons over web service but it is not permitted within SOAP protocols.

Here is the way how you can make this accessible with a tweak, while calling service replace this special characters with:

< is converted to &lt;

> is converted to &gt;

& is converted to &amp;

is converted to &quot;

Now at the other end you just need to decode it to get back the original special character that you have. Here is the code you need to write-

//RWN
Bigtext.ADDTEXT(DecodeSpecialCharacter.HtmlDecode(InputBigtext));
//RWN

Here Bigtext will have decoded value coming in InputBigtext.

DecodeSpecialCharacter    DotNet     System.Net.WebUtility.’System, Version=4.0.0.0, Culture=neutral, PublicKeyToken=b77a5c561934e089′

CHEERS


Debit Credit Concept – Accounting


Hey Friends,

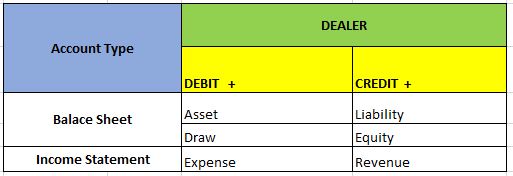
I know there’s always been a confusion to understand this Accounting concept like which account gets Credited and exactly which will get Debited as there’s no generic sign for Debit and Credit. Sometimes Debit means Positive (+) and sometimes it means Negative (-) and the same goes vice versa for Credit. So I just made this small structure which will help you understand when Debit means positive and for which Account Type and the same for Credit.


Here Account Type means either its a Balance Sheet or Income Statement. Debit (+) means this Account will get Debited with a + value and Credit will be in -. The same way this will get Credited + means this Account will be Credited with a  + value and Debit will be in -.

I wrote DEALER on the top because it will make easier for you to remember the Accounts. First three DEA means Draw, Expense and Asset and last 3 LER means Liability, Equity and Revenue.

CHEERS